
POP TARTSfeatured
I could live on Pop Tarts. Seriously, I really could. Hot or cold. Fruit or cinnamon. Doesn’t matter. Just give them all to me.
If you’ve read anything about my Mom on this blog, you know processed foods just weren’t her thing. Win for her. Sucked for us. Where my best friends had Pop Tarts for breakfast, we had fresh jam and homemade wheat bread. Yeah, I get how awesome that is now, but as a kid. Totally lame.
However, in college I realized when it was the end of the month and I was super poor you could buy your groceries at a gas station. On a credit card. Game changer. And you know what you can buy on a Chevron credit card? Pop Tarts. Probably not my smartest move both for my health and for my debt status, but whatever. I was 18. And Pop Tarts were dirt cheap. And delicious. And highly processed. All things that made them a major win in my book.
And yeah, I’m not 18 anymore, but Pop Tarts still rule my world. Especially the cherry ones.
Recipe: Pop Tarts | Soundtrack: Oingo Boingo
- CRUST
- 6 cups flour
- 2 tbsp cornstarch
- 4 tbsp sugar
- 2 tsp salt
- 2 cups cold butter
- 1 cup whole milk
- 1 tbsp vinegar
- 2 large eggs, beaten (To brush on the pastry)
- FILLING
- 1 cup good quality berry jam (blueberry, strawberry, blackberry, etc)
- 1 tbsp cornstarch mixed with 1 tbsp cold water
- GLAZE
- 4 tbsp butter, softened
- 1/2 cup milk
- 2 tsp almond extract
- 5 cups powdered sugar
Directions:
To Make the Crust: Mix the flour, cornstarch, sugar and salt together in a large bowl. Add the cold (this is very important) butter pieces and coat with the flour mixture using a spatula. You can do the next step one of two ways. First option: using a pastry blender cut the butter into the flour mixture, working quickly until mainly pea size pieces of butter remain. Be careful not to over blend. Second option: Dump your flour and butter mixture onto a large cutting board and using two bench scrappers, cut in the butter until pea size pieces remain.
Combine the milk, vinegar, with a few cubes of ice in a large measuring cup or a small bowl. Sprinkle 2 tbsp at a time over the flour mixture and mix it with a fork until it comes together in a ball with some dry bits remaining. The dough should not feel wet or overly sticky. Squeeze and pinch with your fingertips to bring all the dough together. ** You might not use all of the milk mixture. Don’t be alarmed. Stop adding the milk once you are able to hold the dough together in a ball. Shape the dough into a 2 flat discs, wrap each in plastic and refrigerate for at least an hour or overnight.
To Make the Filling: Choose a jam that has nice chunks of fruit. If you can find one that is fresh and homemade that’s the best.
Mix the jam with the cornstarch/water mixture in a small saucepan. Bring the mixture to a boil and simmer, stirring for couple minutes. Remove from the heat and set aside to cool.
To Make the Glaze: In a mixer fitted with the paddle attachment, beat the butter until it’s smooth. Make sure it’s softened. If it’s not, you will have butter chunks in your frosting. Add the milk, almond extract, salt and the powdered sugar until it’s the right consistency. *Add more milk or powdered sugar as you go to get it to the right consistency. Glaze should be thick enough to stay on the tart, but thin enough that if you lifted a spoonful of the glaze it would slowly drip off the spoon.
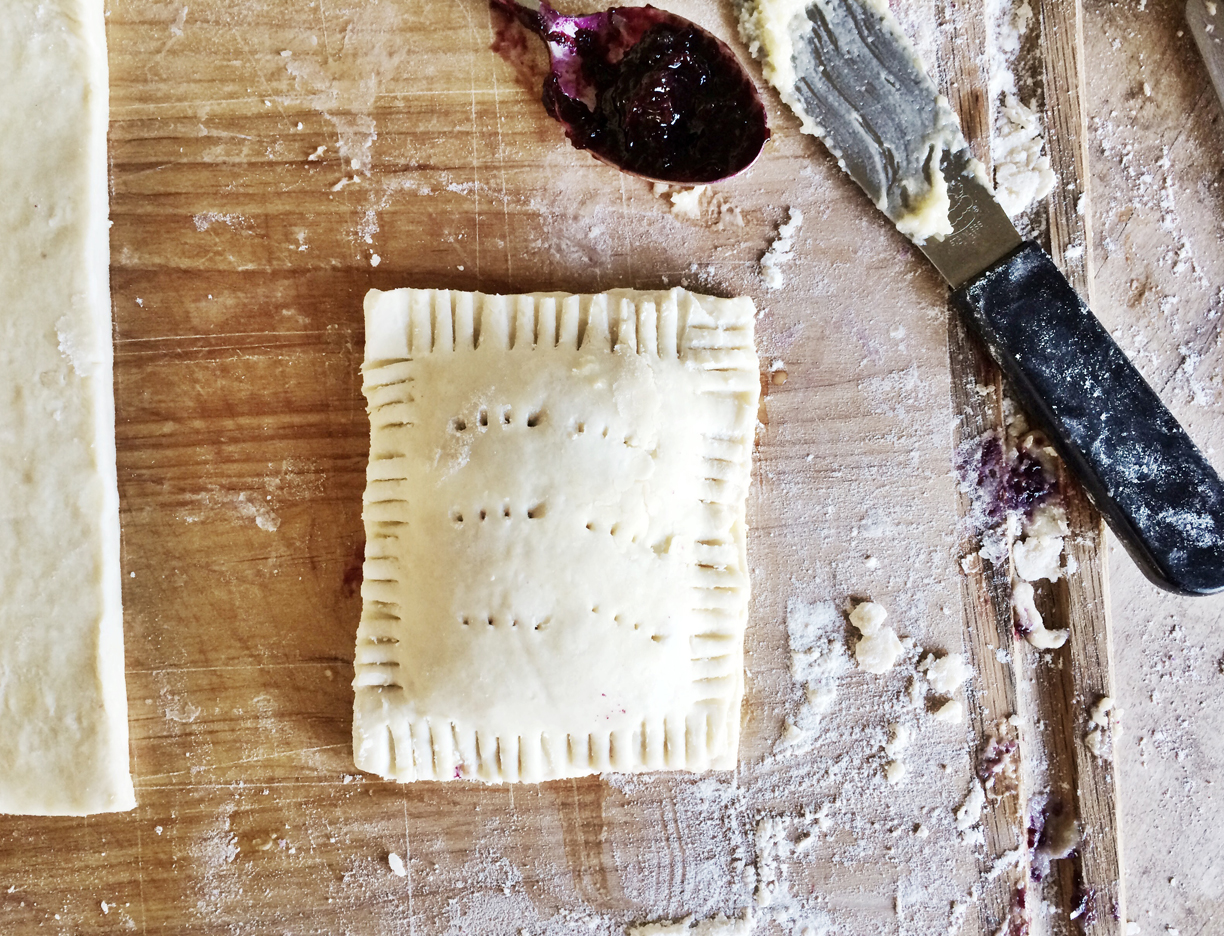
To Make the Tarts: After the dough has been chilled, remove one disc from the refrigerator and allow it to become workable, about 15 minutes. Place one piece on a lightly floured work surface, and roll it into a rectangle the best you can about 1/8″ thick. Roll the rough into approx. a 9 x 12 inch rectangle. Use the bottom of a 9 x 13 inch pan to help guide you. Cut each piece of dough into thirds on the long side, and then cut them in half so you have 6 pieces. Save your trimmings so you make another set.
Place a large spoonful of filling into the center of half the rectangles, keeping a 1/2-inch border around it. Place a second rectangle of dough on top the first. Using your fingertips, press firmly around the pocket of filling, sealing the dough on all sides. Using a fork, press the tines all around the edge of the rectangle to make sure it’s properly sealed.
Place the tarts on a lightly greased baking sheet. Prick the top of each tart multiple times with a fork or a toothpick. Using the beaten egg, lightly brush over the tops of the pastries. Refrigerate the tarts for 20-30 minutes. With the additional dough plus the other disc from the refrigerator, make another set of tarts. Repeat the steps until all the dough is gone.
While the tarts are chilling, preheat the oven to 350 degrees.
When tarts are cooled, remove from the fridge and bake for 20 to 25 minutes, until they are light golden brown. While the tarts are cooking place cooling racks on the counter and put a sheet of wax/parchment paper underneath. Remove pan from the oven and place on a cooling rack for 5 minutes. After cooling for 5 minutes, gently remove tarts and place on cooling racks. Using a pastry brush drizzle the glaze over the tarts while they are still warm. Add as much glaze as you like.
About the author

KJ
Fact. I believe eating your feelings is highly underrated, a good soundtrack is essential to baking and that most life decisions can be solved over a perfect chocolate chip cookie and a tall glass of milk. Want to see more? Follow me on instagram @kj_bluebellcourt
